
Lone Worker Safety Program: A Practical 2026 Guide
A lone worker incident is common enough to demand its own operating system. In a survey of 478 companies, 68% reported a lone-worker incident in the previous three years, and 20% of those incidents were rated “quite severe” or “very severe” according to the National Safety Council’s lone-worker monitoring research. The question for HR and security leaders isn’t whether isolated work creates risk. It’s whether someone will notice, decide, and act when the worker can’t call for help.
A reliable lone worker safety program is more than a wearable, an app, or a policy stored in the HR system. It’s a controlled response process with clear ownership, useful monitoring signals, trained people, and evidence that responders can act on quickly. The device matters, but the human-in-the-loop escalation path determines whether an alert becomes protection or background noise.
Table of Contents
- Why Lone Worker Safety Programs Matter in 2026
- Identifying Lone Roles and Writing the Policy
- Designing Check-Ins and Monitoring Layers
- Building the Human-in-the-Loop Escalation Path
- Training Workers, Supervisors, and Responders
- Measuring Program Effectiveness Over Time
- Launch Checklist and Common Pitfalls
Why Lone Worker Safety Programs Matter in 2026
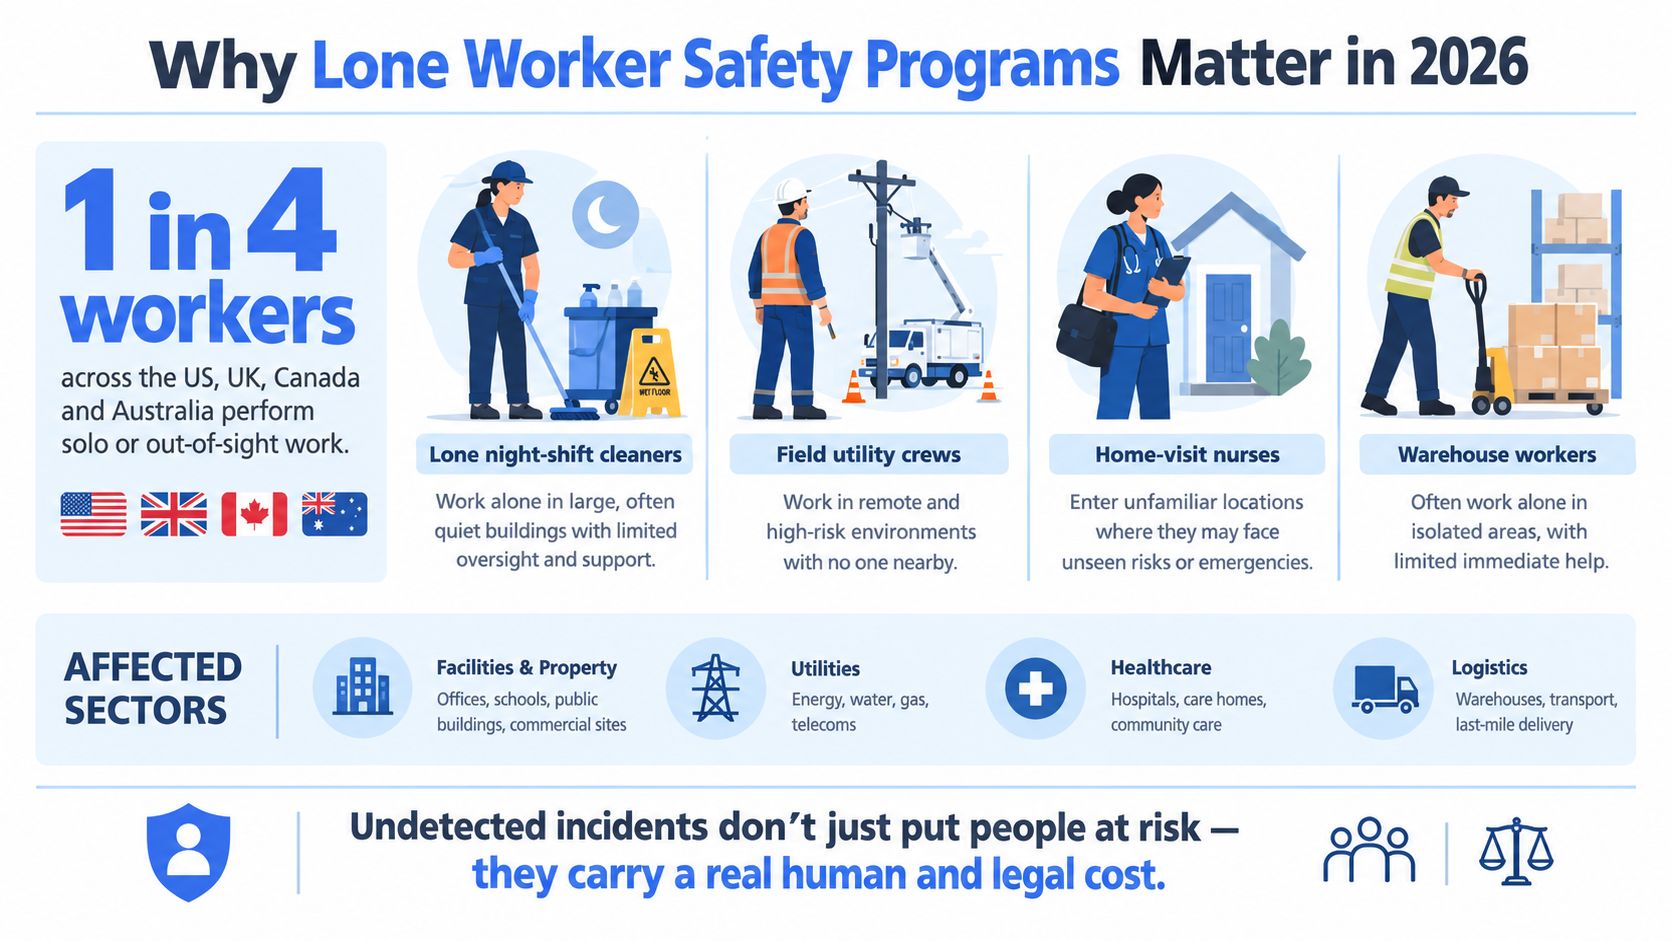
Lone work is not limited to remote field crews. It includes night-shift cleaners, utility technicians, residential maintenance staff, research personnel, warehouse employees, home-visit workers, and campus security officers moving through quiet buildings after hours. The scale is substantial. A widely cited estimate referenced by NIOSH’s guidance on lone workers places the lone-worker population at about 53 million people across the United States, Canada, and Europe, or roughly 15% of the overall workforce.
That estimate also exposes a management problem. Employers often don’t formally classify people as lone workers, particularly when isolation happens only during certain shifts, routes, tasks, or building closures. A campus employee may work beside colleagues during the day but become effectively alone after the last department leaves. A maintenance technician may have a radio but no one within practical reach. Your roster, not the job title, reveals the exposure.
Severity is the operational issue
A fall, cardiac event, seizure, assault, gas exposure, or severe weather incident becomes more dangerous when nobody sees it happen. A nearby colleague might call emergency services, open a door, retrieve a first-aid kit, or begin CPR. A lone worker may have no way to communicate, and a missed message can sit unnoticed while the situation worsens.
That’s why lone work belongs in the organization’s formal risk-control system. It shouldn’t be a footnote in a general safety handbook or an optional feature in a phone plan. The policy must define who is monitored, what counts as a missed confirmation, who receives the alert, and what evidence authorizes a dispatch.
Operational rule: If a worker can become incapacitated without immediate observation, treat the role as a monitored safety role, even if the task itself appears routine.
A safety manager should also measure the program against ordinary operational controls. Tracking incidents, response delays, and missed confirmations can support efforts to calculate accident frequency rates, but don’t let one lagging indicator become the whole program. The meaningful question is whether the organization can detect a problem and put the right person in motion before an incident becomes a fatality, a prolonged absence, or a regulatory crisis.
Identifying Lone Roles and Writing the Policy
Start with a roster review, not a technology demonstration. Export every job code, shift pattern, and work location. Mark any assignment where a worker can be more than 10 minutes from a colleague, including remote work, hybrid work, mobile visits, isolated laboratories, storage areas, and after-hours campus duties.
Then test each role against four hazard groups:
- Environmental hazards, including slips, falls, confined spaces, machinery, poor lighting, and extreme temperatures.
- Medical hazards, including fatigue, known medical vulnerabilities, strenuous work, and tasks where a worker could become immobile without warning.
- Interpersonal hazards, including client visits, cash handling, security duties, late-night contact with the public, and work in unfamiliar residences.
- Emergency hazards, including gas releases, fire, flooding, severe weather, utility failures, and locations where access routes may become blocked.
Use a simple risk matrix to decide whether a role needs full monitoring, scheduled check-ins, a buddy protocol, or no additional control beyond standard supervision. Don’t assign every employee the same burden. A low-risk employee working alone in a locked office needs a different control from a utility worker entering a remote pump station.
Lone Role Hazard Classification Matrix
| Hazard Category | Examples | Low (1) | Medium (2) | High (3) |
|---|---|---|---|---|
| Environmental | Slips, falls, confined spaces, machinery | Stable indoor area, routine movement | Uneven surfaces, isolated rooms, occasional equipment exposure | Confined space, fall exposure, hazardous machinery |
| Medical | Cardiac event, seizure, fatigue, immobility | Sedentary work with nearby access | Physical work, extended shifts, limited nearby support | Strenuous work, high fatigue exposure, delayed access to help |
| Interpersonal | Client visits, cash handling, night work | Controlled access and predictable contacts | Public-facing work or unfamiliar visitors | Residential visits, threat history, isolated after-hours duties |
| Emergency | Gas, fire, severe weather, utility failure | Multiple exits and reliable communication | Partial coverage or variable access | Hazardous materials, remote sites, blocked or uncertain response routes |
Your policy should fit on a page before appendices. Include its purpose, scope, definitions of lone work and out-of-sight work, supervisor responsibilities, monitoring expectations, escalation rules, training requirements, and review ownership. Name roles by title, such as “Duty Security Officer,” rather than by person. People leave. Titles survive turnover.
Attach the hazard matrix as Appendix A and keep a role register with the policy. A practical lone worker policy framework can help with structure, but your organization must still define its own hazards, coverage limits, and responder authority.
The policy also needs a stop-work rule. Workers should know when they must not proceed alone, when they need a partner, and what to do if the approved device has no coverage or a responder doesn’t acknowledge an alert. A policy that only describes normal operations will fail during the exact conditions that create the emergency.
Designing Check-Ins and Monitoring Layers
A monitoring channel is useful only if it produces a signal someone can interpret and act on. Compare the options by operational fit, not by feature count. When an app-based channel fits the role, this comparison of lone worker safety app options for employers covers specific products side by side.
| Channel | Detection Signal | Battery / Maintenance | False Alarm Risk | Best Fit Role |
|---|---|---|---|---|
| Scheduled phone check-in | Worker confirms status by voice | Low device burden, high process dependence | Medium, especially when workers are busy | Lower-risk mobile and office roles |
| Mobile app dead-man timer | Missed confirmation or timer expiry | Depends on phone charge, permissions, and coverage | Medium to high if schedules change often | Field staff with dependable cellular coverage |
| Wearable panic button | Worker-triggered duress alert | Requires charging, inspection, and ownership control | Low for deliberate activation, higher for accidental presses | Client-facing, security, and high-contact roles |
| Bluetooth beacon with man-down detection | Fall, immobility, or beacon event | Requires infrastructure and battery checks | Medium, particularly around unusual movement | Facilities, industrial, and campus zones |
| Supervisor ride-along | Direct observation and verbal confirmation | Staff time and scheduling required | Low, but infrequent coverage | Higher-risk assessments and new assignments |
Use a hybrid cadence, not one fixed interval for every task. For routine shifts, scheduled confirmations can occur every 2 to 4 hours as a policy recommendation. For high-risk roles or after-hours work, use tighter 30 to 60 minute intervals. Add event-triggered contacts when a worker enters a confined space, leaves a vehicle at a remote site, begins a high-risk client visit, or completes a task that changes the hazard profile.
A missed confirmation should generate an automatic reminder first, then escalate after two consecutive missed check-ins. Those intervals are operating choices, not universal safety facts. Set them against the time in which an incident could become unrecoverable, the worker’s route, the available coverage, and the responder’s real capacity.
Make every alert useful
Every alert should show at least:
- Last known location, with the confidence and source of that location.
- Time since last confirmation, including whether the worker acknowledged a reminder.
- Worker status, such as safe, delayed, in distress, offline, or unresponsive.
- Alert type, such as panic button, fall detection, missed check-in, or device tampering.
- Communication options, including call, text, app message, audio, or direct emergency dispatch.
A silent alert with no location, timestamp, or ownership is not monitoring. It’s an unresolved notification. Risk-based monitoring should let the organization apply stronger controls to higher-risk tasks instead of overwhelming responders with identical alerts. The principles in this risk-based monitoring guide are useful when you’re deciding which roles need automated detection rather than simple check-in reminders.
Design test: Shut off the worker’s phone, remove network coverage, and miss a check-in during a shift change. If the team can’t explain what happens next, the monitoring design isn’t ready.
The escalation team also needs a communication playbook for outages, severe weather, multi-worker incidents, and conflicting information. A practical crisis communication guide for HR leaders can support that broader planning, but it shouldn’t replace the specific alert rules in the lone-worker policy.
Building the Human-in-the-Loop Escalation Path
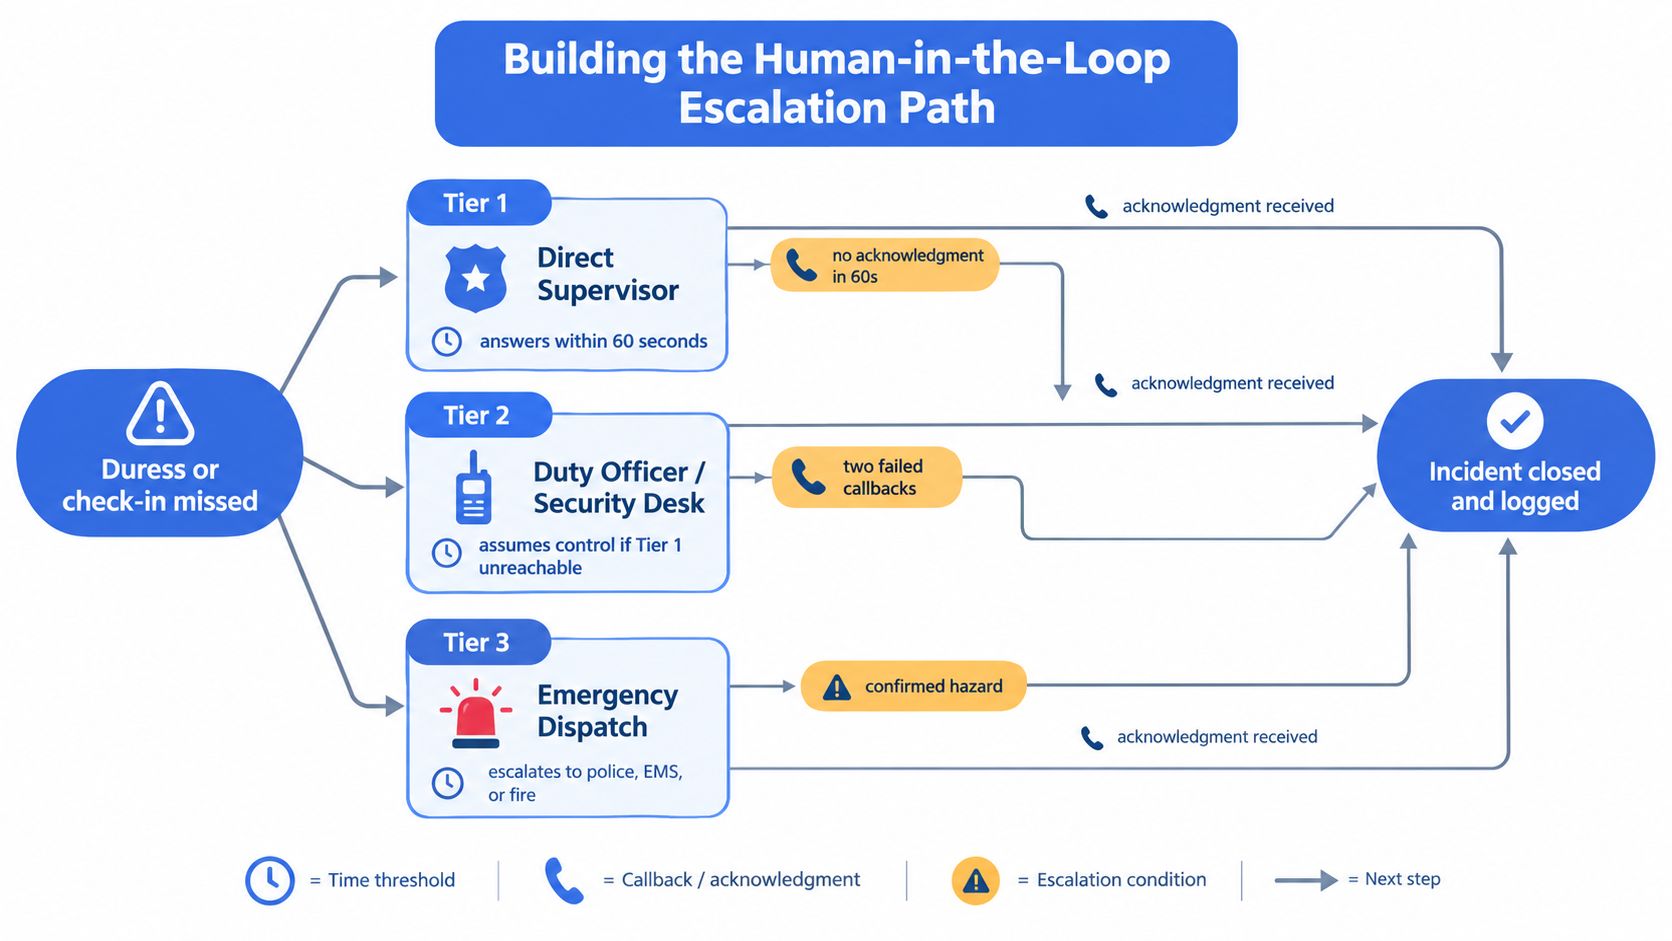
The escalation path must be a decision tree, not a phone tree. A phone tree tells people whom to call. A decision tree tells them what the signal means, what they’re authorized to do, when to move to the next tier, and what information must travel with the handoff.
Use three named responder tiers:
- Tier 1, direct supervisor. The supervisor receives the alert and attempts contact. Set a written acknowledgment standard, such as answering within 60 seconds, but assign a backup whenever the supervisor is unavailable, off-site, asleep, or already handling another incident.
- Tier 2, duty officer or security desk. This tier assumes control when Tier 1 doesn’t respond or cannot verify the worker’s condition. It checks the single incident record, attempts contact, and coordinates access.
- Tier 3, monitoring center or emergency dispatch. This tier engages when the worker remains unreachable, the hazard is confirmed, or the internal team cannot act safely. The handoff should include the last known location, incident timestamp, worker profile, alert type, and any available audio or video.
The exact timing should be written into the policy and tested in drills. The key is that escalation must continue automatically when a person fails to respond. Don’t make the next responder wait for the first responder to “get around to it.”
Define evidence and authority
Each tier needs a written handoff containing five things:
- What triggered the alert, such as a duress button, fall event, missed check-in, audio clip, or offline device.
- What the responder can see, including location, route, timestamp, status, and prior confirmations.
- What the responder must attempt, such as a call, two-way message, security sweep, or access-control check.
- When emergency services are contacted, including confirmed hazard, no contact after the defined escalation window, or evidence that the worker may be incapacitated.
- Who owns the incident record, so every action is time-stamped in one source of truth.
The tree must handle failure modes explicitly. If the worker’s phone is unreachable, don’t keep retrying the same channel. If the device is offline, treat loss of signal as a condition requiring investigation, not as proof that the worker is safe. If supervisors are off-site, route the alert to the duty officer without waiting. If false alarms are frequent, improve confirmation logic and training instead of weakening escalation.
A human-in-the-loop design works only when the human has enough context to decide. A platform such as real-time safety monitoring can support centralized visibility, but the organization still needs responder authority, backup ownership, and emergency-service criteria.
Use a live drill to verify that a responder can find the record, contact the worker, locate the access point, and hand off to emergency services without opening multiple systems.
After every real incident or serious drill, debrief the worker, supervisor, responder, and policy owner within 24 hours. Record what signal appeared, who acknowledged it, where the handoff slowed, and which policy or technology change has an owner. An incident isn’t closed when the worker is safe. It’s closed when the organization has learned why the response worked or failed.
Training Workers, Supervisors, and Responders
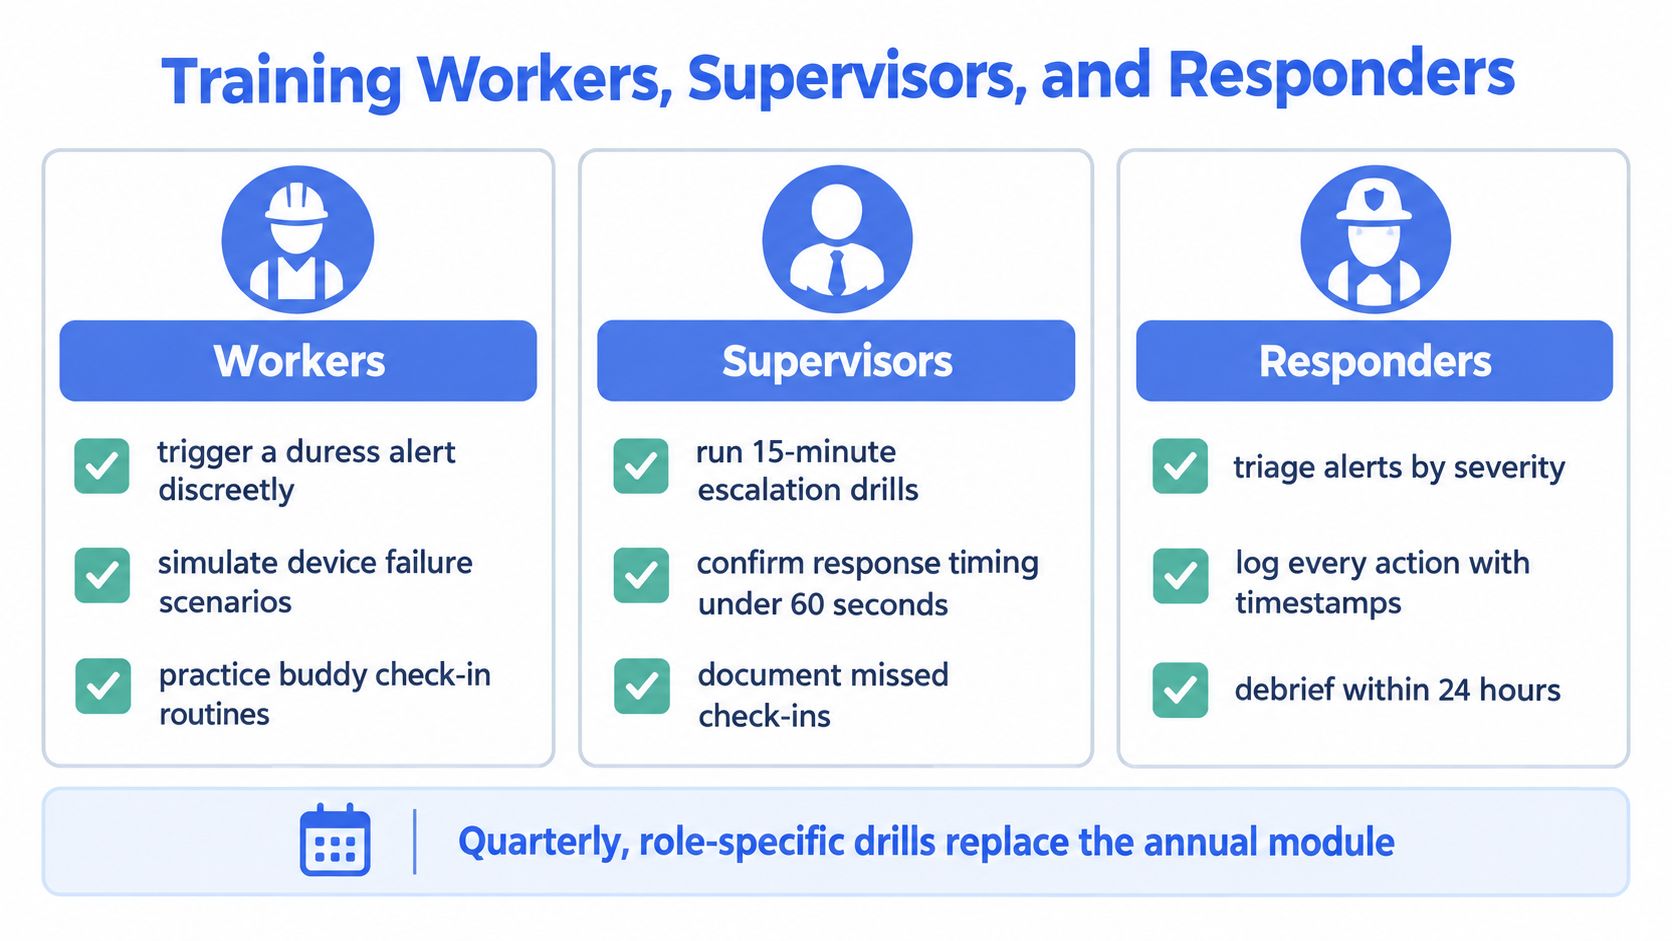
Replace the generic annual module with short, role-specific drills. Workers, supervisors, and responders face different decisions under pressure, so they need different practice.
Workers need muscle memory
A worker should practice with the exact device or app assigned to the role. The drill must cover:
- Triggering a duress alert discreetly.
- Completing a scheduled check-in while carrying equipment or wearing gloves.
- Sending a “safe but delayed” status without creating an unnecessary escalation.
- Responding to a device warning, low battery, or loss of coverage.
- Explaining the worker’s location and task to a responder.
New hires should complete the onboarding drill during their first week. Don’t wait for the annual training cycle. Refresher practice should happen quarterly and whenever the organization changes devices, routes, hazardous zones, or escalation ownership.
Supervisors need decision practice
Supervisors should work through tabletop scenarios rather than just watching a product demonstration. Give them a worker who is two minutes overdue and not answering, an alert that arrives during a meeting, or a low-battery warning just before an after-hours assignment.
The supervisor must decide whether to call, message, involve Tier 2, check access logs, send a colleague, or contact emergency services. The exercise should test whether they know the timing standard, the backup responder, the last known location, and the difference between a delayed worker and an unresponsive worker.
Responders need the most realistic practice. Give them simulated coordinates, an alert type, an audio snippet where appropriate, and incomplete information. Make them log each action, perform the handoff, and explain why they escalated or closed the incident.
Every drill ends with a short debrief and a written change note. If workers routinely miss one screen, if supervisors open the wrong dashboard, or if responders can’t find the nearest entrance, update the process. Don’t label the problem “user error” and move on.
Measuring Program Effectiveness Over Time
A dashboard filled with alerts can create the illusion of control. Measure whether the program detects risk, produces a timely human response, and improves after failures.
Review leading and lagging indicators on a fixed quarterly cadence with one named owner. Leading measures show whether the controls are ready before an incident occurs. Lagging measures show what happened after the system was tested by reality.
| Metric | Type | Target | Review Owner |
|---|---|---|---|
| Check-in compliance | Leading | Set a role-specific floor, such as 95% | Safety program owner |
| Response to missed check-in | Leading | Define a maximum acceptable response window | Duty officer |
| Device uptime | Leading | Maintain coverage suitable for each assigned role | Technology owner |
| Drill completion | Leading | Complete all scheduled role-specific drills | Training lead |
| Supervisor acknowledgment time | Leading | Set a median response standard, such as 60 seconds | Operations manager |
| Total lone-worker incidents | Lagging | Review trend and context, not volume alone | Safety committee |
| Incident severity | Lagging | Track severity categories and recurrence | Safety manager |
| Time to dispatch | Lagging | Compare against the escalation standard | Security lead |
| False-alarm rate | Lagging | Set a threshold that preserves trust without suppressing alerts | Program owner |
| Days away from work | Lagging | Review lone-worker events and corrective actions | HR and safety |
The targets above should be approved by the organization, not copied blindly. A campus security team, home-visit service, and utility operator have different response realities. The important discipline is to set the target before the next review, assign an owner, and document the corrective action when performance slips.
Avoid vanity metrics such as total alerts generated. A noisy system can produce more alerts while making responders less attentive. Track confirmation quality, time to human acknowledgment, time to dispatch, and whether the responder had enough information to act.
Use a one-page monthly view for operational management and a deeper quarterly review for trend analysis. When the false-alarm rate rises, inspect device placement, button design, timer rules, and training. When acknowledgment slows, inspect staffing, shift coverage, backup ownership, and dashboard usability.
A serious review ends with three fields completed before the meeting closes: corrective action, accountable owner, and due date. Without those fields, the dashboard is reporting, not management.
Launch Checklist and Common Pitfalls
Launch the program in phases. Keep the checklist visible to the people who own the work.
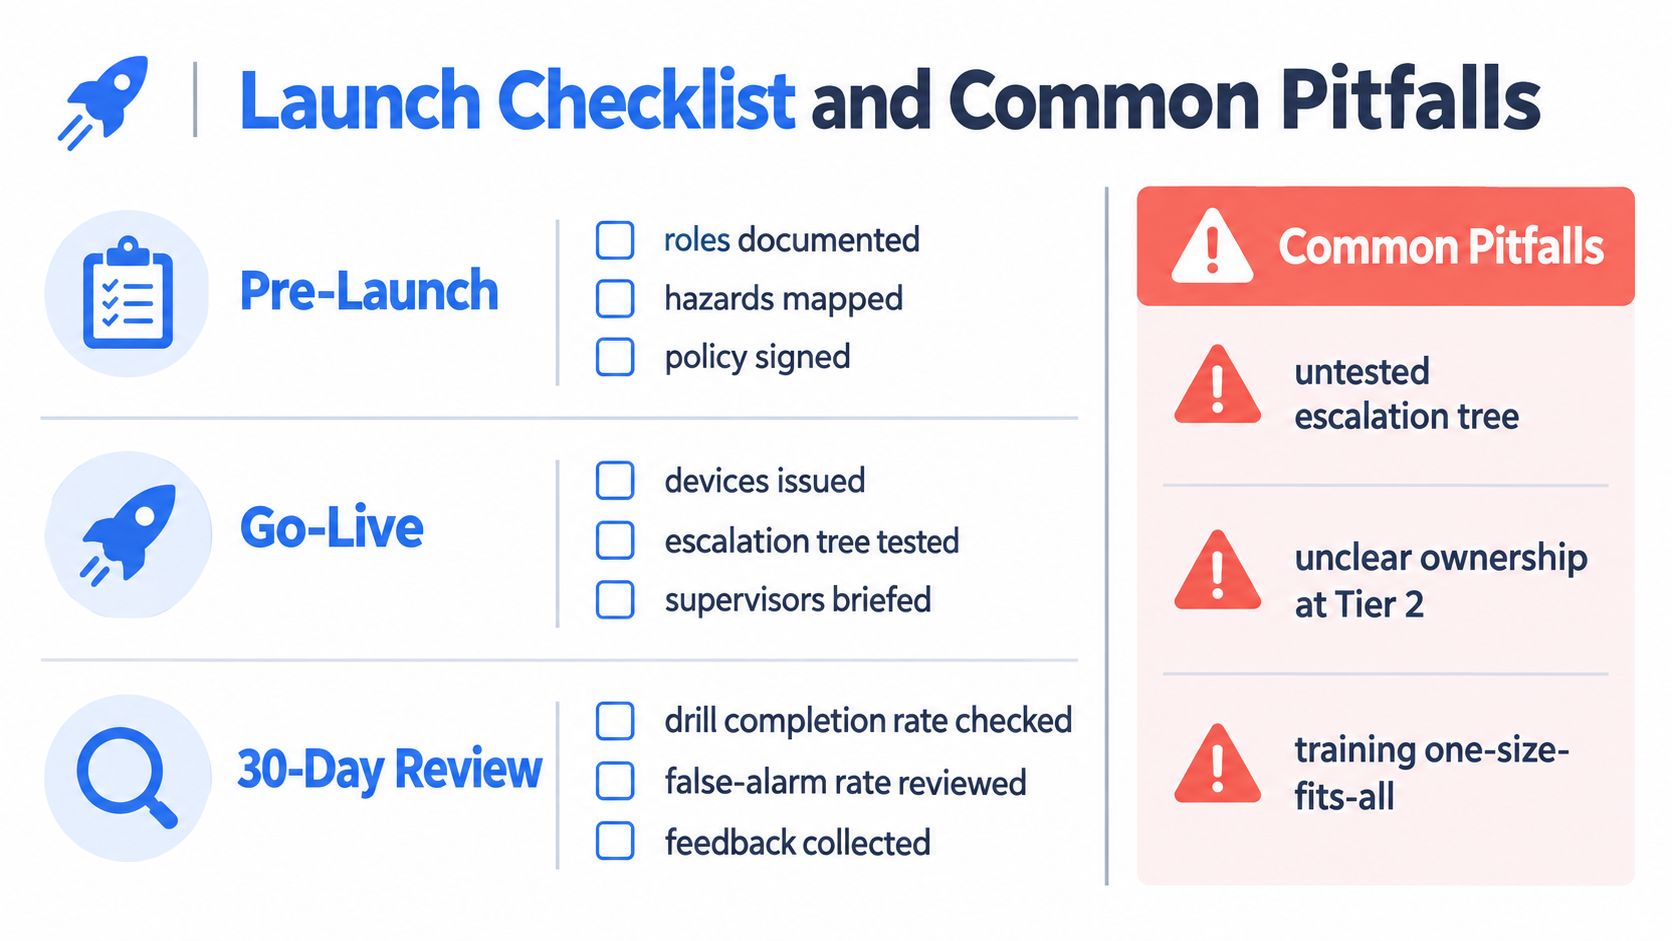
Pre-launch
- Document roles: Identify every lone and out-of-sight assignment.
- Map hazards: Classify environmental, medical, interpersonal, and emergency exposure.
- Approve the policy: Name responder tiers, backups, escalation rules, and review ownership.
- Confirm coverage: Test phones, apps, wearables, beacons, building access, and emergency routes.
- Brief stakeholders: Include HR, safety, security, operations, IT, and worker representatives.
Go-live
- Issue devices: Record assignment, charging expectations, replacement process, and worker acknowledgment.
- Test the escalation tree: Trigger a missed check-in and a duress alert. Verify every handoff.
- Brief supervisors: Give them the response standard, backup contact, and single incident record.
- Run a worker drill: Confirm that each person can trigger, cancel, and explain an alert.
- Log exceptions: Record coverage gaps, inaccessible locations, and tasks that need a different control.
Thirty-day review
- Baseline the metrics: Check compliance, acknowledgment, uptime, drills, false alarms, and dispatch time.
- Inspect training gaps: Identify roles that missed practice or misunderstood the safe-delay process.
- Review feedback: Ask workers where the system interrupts work, fails to fit, or creates confusion.
- Update ownership: Replace unavailable responders and fix weak Tier 2 coverage.
- Approve changes: Give each correction an owner and due date.
Four failure patterns appear repeatedly:
- Fixed cadence for every role: Match monitoring frequency to task, location, and hazard.
- No backup responder: Assign a named Tier 2 owner for every shift and absence scenario.
- One annual training module: Run short, quarterly drills by role and train new hires during onboarding.
- Device equals program: Treat the device as one signal inside a policy, monitoring, escalation, and review system.
The launch decision is simple. Don’t ask whether you bought the right gadget. Ask whether a worker can become unresponsive, whether the system will produce useful evidence, and whether a trained person will take control without waiting for someone else.
3rd-i offers live video, audio, and location sharing, one-tap check-ins, trained Safety Agent monitoring, and emergency escalation through RapidSOS for lone-working and after-hours scenarios. Review 3rd-i for organizations if your organization needs a human-in-the-loop layer for campus staff, traveling employees, late walks, or other work where a missed check-in needs context and a real response.